(Please note that the steps in the guide are intended for those who do not know what to do or what the hell they are doing. If you know what you are doing, you may select different choices and steps with regards to this guide)
Alright, enough of the introduction. Let's start:
First, you need to download the setup.exe for DevC++. You can select your versions here:
http://sourceforge.net/projects/orwelldevcpp/files/Setup%20Releases/
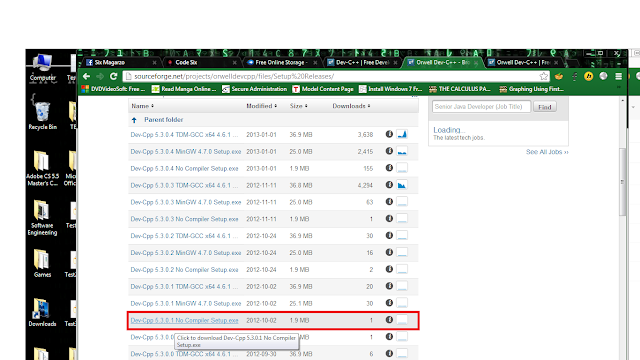
But for the benefit of this guide and the way I learned installing it, I'll be using the DevC++ 5.3.0.1 No Compiler Setup provided above. (As of the time of writing this, the current version is DevC++ 5.3.0.4 No Compiler Setup). Download the installer as pointed below:
To retain the integrity of the file, below is the SHA1 and MD5 sum of the binary/installer:
* For those who aren't that familiar what sha1 or md5 sum does, it checks whether the downloaded file is corrupted or not. Having the same sums mean that the file you have downloaded is not corrupted, otherwise consider re-downloading it.
SHA1 sum: 8db613fe7cfcb5c24d9ef191a089be0ed2bda3fc
But for the benefit of this guide and the way I learned installing it, I'll be using the DevC++ 5.3.0.1 No Compiler Setup provided above. (As of the time of writing this, the current version is DevC++ 5.3.0.4 No Compiler Setup). Download the installer as pointed below:

To retain the integrity of the file, below is the SHA1 and MD5 sum of the binary/installer:
* For those who aren't that familiar what sha1 or md5 sum does, it checks whether the downloaded file is corrupted or not. Having the same sums mean that the file you have downloaded is not corrupted, otherwise consider re-downloading it.
SHA1 sum: 8db613fe7cfcb5c24d9ef191a089be0ed2bda3fc
MD5 sum: 9edda17ab6892ebb22dd7bfa7106b966
NOTE: The sums above are the sums for DevCpp5.3.0.1 No compiler setup.exe
NOTE: The sums above are the sums for DevCpp5.3.0.1 No compiler setup.exe
After downloading, run the installer:
Select your language: (Wala pong Filipino dyan, piliting mag English kahit nosebleed)
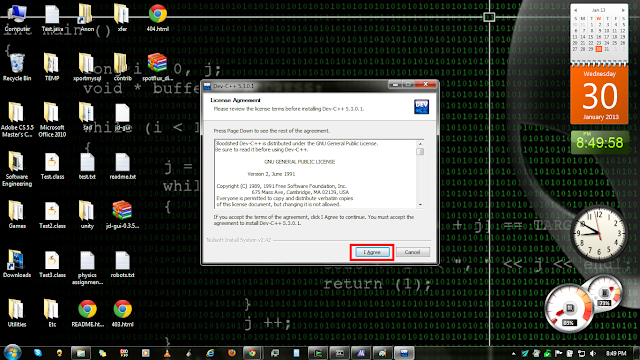
Read the License Agreement, then click I Agree if you agree :)
Select Full Installation (depends on your preference), then click Next.
Browse your preferred installation folder, then click Install.
(The installation folder seen below is the default installation folder for 64-bit platforms)
After installing, click Finish:
You have successfully installed DevC++ IDE~!
Now, for the next step. IDE is useless if we don't have a compiler to compile our source codes. Others might wonder, why not install the DevC++ with its default compilers? My answer is simple: To enable others to troubleshoot and install their specific compilers in the future if they encounter situations wherein they are forced to use specific versions of compilers other than the default one. Some programming competitions enforce strict selection of compiler versions to be used. Well, you can of course switch compilers inside the DevC++ IDE, but it's good to learn other methods of installation other than the common way. Besides, MingW is quite popular if you're looking for the Windows binaries and libraries of GCC.
Okay enough of the argument. Let's start the installation of our compiler.
For our compiler, we will be using MingW. As quoted from http://en.wikipedia.org/wiki/MinGW:
MinGW (Minimalist GNU for Windows), formerly mingw32, is a native software port of the GNU Compiler Collection (GCC) and GNU Binutils for use in the development of native Microsoft Windows applications. MinGW can function either as a cross compiler targeting Windows or as a nativetoolchain run on Windows itself.It is deployed along with a set of freely distributable import libraries and header files for the Windows API.
MinGW (Minimalist GNU for Windows), formerly mingw32, is a native software port of the GNU Compiler Collection (GCC) and GNU Binutils for use in the development of native Microsoft Windows applications. MinGW can function either as a cross compiler targeting Windows or as a nativetoolchain run on Windows itself.It is deployed along with a set of freely distributable import libraries and header files for the Windows API.
First, we need to download the MingW installer that can be found at http://sourceforge.net/projects/mingw/files/Installer/mingw-get-inst/
Again, for the purpose of this guide, I will be using the mingw-get-inst-20120426 since this version is the latest version at the time of writing this guide.
Similar to the DevC++ installer, we need to check the integrity of the file, below is the SHA1 and MD5 sum of the binary/installer:
SHA1 sum: 1f0f7b9eeaa8c13f9b5b2d2bd489e78b3e168605
SHA1 sum: 1f0f7b9eeaa8c13f9b5b2d2bd489e78b3e168605
MD5 sum: d0012a847ae81e92ce6aca3ef8d81c5b
NOTE: The sums above are the sums for mingw-get-inst-20120426.exe
NOTE: The sums above are the sums for mingw-get-inst-20120426.exe
After downloading, run the downloaded installer:
Click Next:
Again, click Next:
Select the "Download latest repository catalogues" then click Next:
As usual, read the License Agreement then click I accept the agreement then click Next:
Browse your preferred installation folder. (I suggest that you use the default installation folder), then click Next:
NOTE: Remember the installation folder you've chosen. We will be using this later on.
Check or uncheck the Don't create a Start Menu Folder depending on your preference then click Next:
Below is the screenshot of the compilers you would like to install. This is one of the advantages when installing DevC++ without the default compilers. You may choose the compilers you need or want. Check the boxes next to the compiler name to select the item.
After choosing the compiler(s) of your choice, click Next.
Click Install afterwards:
After clicking the Install button, several cmd.exe (Command Prompt) will pop up. Don't be alarmed, this is normal. This is because of the downloading of the updated and necessary libraries, binaries and files needed for the installation. Just wait for those to finish until you've seen that the installation has been successful:
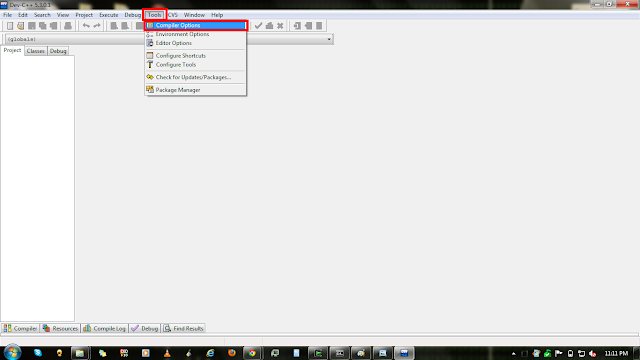
First, open DevC++. Then on the upper part, you'll see several Menu. Click Tools, then click Compiler Options:
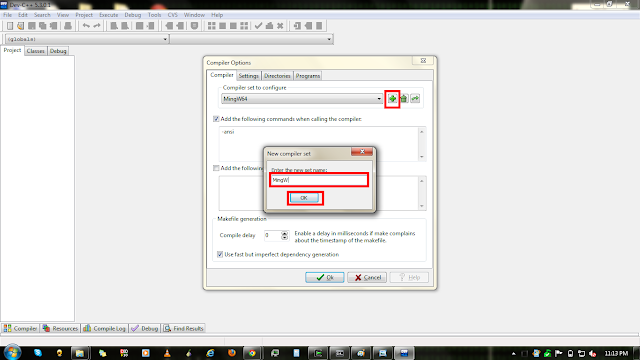
Now, click the + button and a dialog box pops up. Type the compiler name you would like to call your compiler. I used "MingW" to avoid ambiguity:
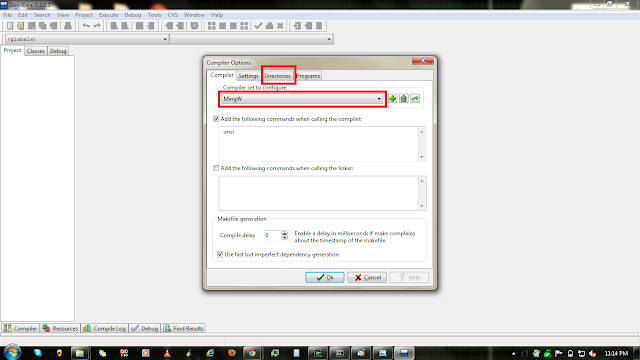
Next, select the newly created compiler profile from the drop down menu then click the Directories tab:
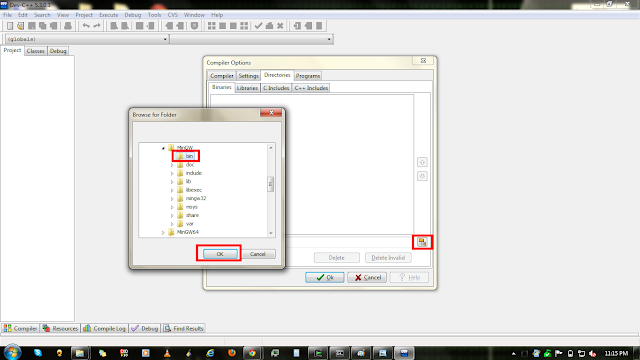
While on the Directories tab, click the small icon on the lower right and a Folder Browser pops up. Browse the folder where you have installed MingW. Expand that folder and select the folder named bin. Then click OK:
After that, click the Add button:
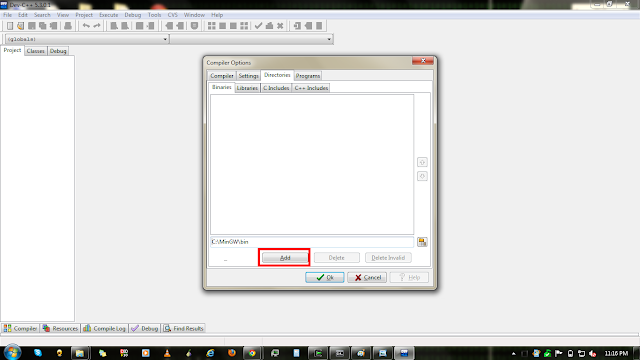
Again, click the button on the lower right and the Folder Browser pops up as usual. Browse and expand the MingW installation folder again, then expand the mingw32 folder inside it. After that, select the bin folder and click OK. Then click Add so that you have the similar pattern of paths as shown below:
Do the steps above again on the Libraries tab this time until you have the same paths as shown below:
Do the steps again, on the C Include AND C++ Include tab this time, until you have the same paths as shown below:
Yes, both C Include tab and C++ Include tab have the same paths.
If you have followed the steps carefully, you will have the same outputs in the Programs tab as shown below:
Of course, after checking the Programs tab, click OK to save the configuration. You may explore this setting again some other time when you are already used to using the said IDE.
Alright we're done~! Now you may explore your freshly installed IDE and start coding.
Any questions, comments, corrections, violent reactions and whatsoever issues you have are welcome and will be appreciated.
Happy coding guys!




how can i turn off the sounds on your blog without turning off the sound on my PC??
ReplyDeleteYou can't. There are things in life that you can't even control. So guess what, you just have to deal with the noise :)
ReplyDelete